Perfect Molten Lava Cakes: Secrets to a Flowing Chocolate Center
Imagine a dessert so enchanting, so utterly decadent, that with a single slice, a river of warm, gooey chocolate spills forth, inviting you into a world of pure indulgence. This is the magic of the molten chocolate lava cake, a culinary masterpiece that has captivated dessert lovers worldwide. Often associated with high-end restaurants, the truth is that mastering the art of homemade
molten chocolate lava cakes with their signature flowing chocolate center is surprisingly achievable in your own kitchen. Forget the intimidation; with a few key secrets and techniques, you can conjure up these delightful treats that are as easy to make as they are impressive to serve.
At its heart, a molten chocolate lava cake is a beautiful paradox: a rich, tender chocolate cake shell encasing a warm, liquid chocolate core. Known also by its sophisticated French name, "Chocolate Moelleux," this dessert artfully bridges the gap between a light soufflé and a dense chocolate brownie, with the luxuriousness of chocolate mousse. The magic lies in a high-heat, short baking time that allows the cake’s exterior to set and rise while the interior remains wonderfully liquid. The result is a dessert dream, a combination of textures and temperatures that simply melts in your mouth.
Mastering the Batter: Key Ingredients and Techniques for Success
The journey to perfect molten lava cakes begins with a simple yet precisely executed batter. While requiring no fancy stand mixer, attention to detail in a few crucial steps will elevate your cakes from good to unforgettable.
First and foremost, the eggs are your secret weapon for a light, airy cake structure. Do not underestimate the power of thorough beating. Whisk your eggs until they transform into a thick, creamy, foamy, and noticeably lighter-colored mixture. This intensive aeration is vital, incorporating air that will give your chocolate batter its signature lightness and fluffiness as it bakes. Think of it as building the foundation for a magnificent structure – a solid, airy base ensures the final cake doesn’t turn out dense or heavy.
Next, let's talk chocolate. The quality and type of chocolate you choose are paramount, as it forms the very soul of your lava cake. Opt for a great-tasting chocolate that melts beautifully and smoothly. While many chocolate chips are designed to hold their shape, certain brands like Ghirardelli or Guittard bittersweet or semisweet chocolate chips are specifically formulated for superior melting. Bittersweet provides a rich depth without being overly intense, appealing to a wide range of palates. Avoid waxy, lower-quality chocolates, as they won't deliver that luscious, pourable "lava" consistency you're aiming for. Remember, the better the chocolate, the more exquisite your flowing chocolate center will be.
Once your luxurious melted chocolate and butter mixture is combined with the aerated eggs, the final step is to incorporate the flour. This is where restraint is key. Add the flour and give the batter just a few quick stirs until the flour is barely combined. Overmixing at this stage can develop the gluten in the flour, leading to a tougher, less tender cake. We want a delicate, tender crumb that cradles the molten center. The resulting batter should be luscious, medium-thick, and easily pourable, with small air bubbles perfectly acceptable – a sign of that wonderful aeration you achieved earlier. For more detailed insights into perfecting your batter, explore our
Homemade Molten Lava Cakes: Essential Tips for Decadent Results.
Preparing for Perfection: Ramekins and Baking Wisdom
Achieving that picturesque molten chocolate flow isn't just about the batter; it's also about how you prepare your baking vessels and precisely manage your oven time.
The unsung hero of the perfect lava cake reveal is the humble ramekin. A well-greased ramekin is non-negotiable for ensuring your cakes pop out easily and elegantly for plating. Start by liberally brushing or rubbing softened butter over the entire interior surface of each ramekin. Pay meticulous attention to the crevices where the sides meet the bottom – these are common sticking points. Once buttered, lightly sprinkle cocoa powder evenly into each ramekin, then tap out any excess. This cocoa dusting serves a dual purpose: it creates a non-stick barrier and adds a subtle chocolate flavor and a beautiful dark finish to the cake's exterior. This simple step ensures a clean release and a visually stunning presentation.
Next, fill each prepared ramekin approximately two-thirds full with your rich chocolate batter. This allows ample room for the cake to rise without overflowing, ensuring an elegant dome and preventing any mess in your oven.
Now for the moment of truth: baking. This is arguably the most critical step for achieving that elusive flowing chocolate center. Bake your molten lava cakes just until the edges and the very top are set, but the center still retains a distinct jiggle when gently shaken. This jiggle is your golden ticket to the molten core. The high heat quickly cooks the outer layer, creating a stable cake structure, while the shorter baking time prevents the center from solidifying. Over-baking, even by a minute or two, can turn your lava into a fudgy brownie center, losing that signature flow. Conversely, under-baking too much will result in a messy, crumbling cake. Every oven is different, so trust your instincts and the visual cues.
While ramekins are traditional, flexibility is also an option. In a pinch, you can bake these delightful cakes in a standard muffin tin. Fill only about 10 of the 12 cups, as the cakes tend to spread a bit more. Be aware that baking time will be a few minutes less, and while perfectly delicious, they might be a bit harder to turn out cleanly or present with the same elegant flair as those baked in ramekins. It's a fantastic solution for a casual treat!
The Grand Finale: Resting, Plating, and Serving Secrets
You’ve mastered the batter and baked with precision; now for the dramatic reveal. The final steps are crucial for presenting your
molten chocolate lava cakes with their picture-perfect flowing chocolate center.
Once out of the oven, resist the urge to immediately flip them. Allow the lava cakes to rest in their ramekins for just 2-3 minutes. This brief resting period is essential: it allows the cake to firm up slightly and pull away from the sides, making for an easier, cleaner release. If you wait much longer, the residual heat from the ramekin will continue to cook the molten center, potentially firming it up too much. Additionally, waiting too long can make it harder to remove the cakes cleanly, risking breakage.
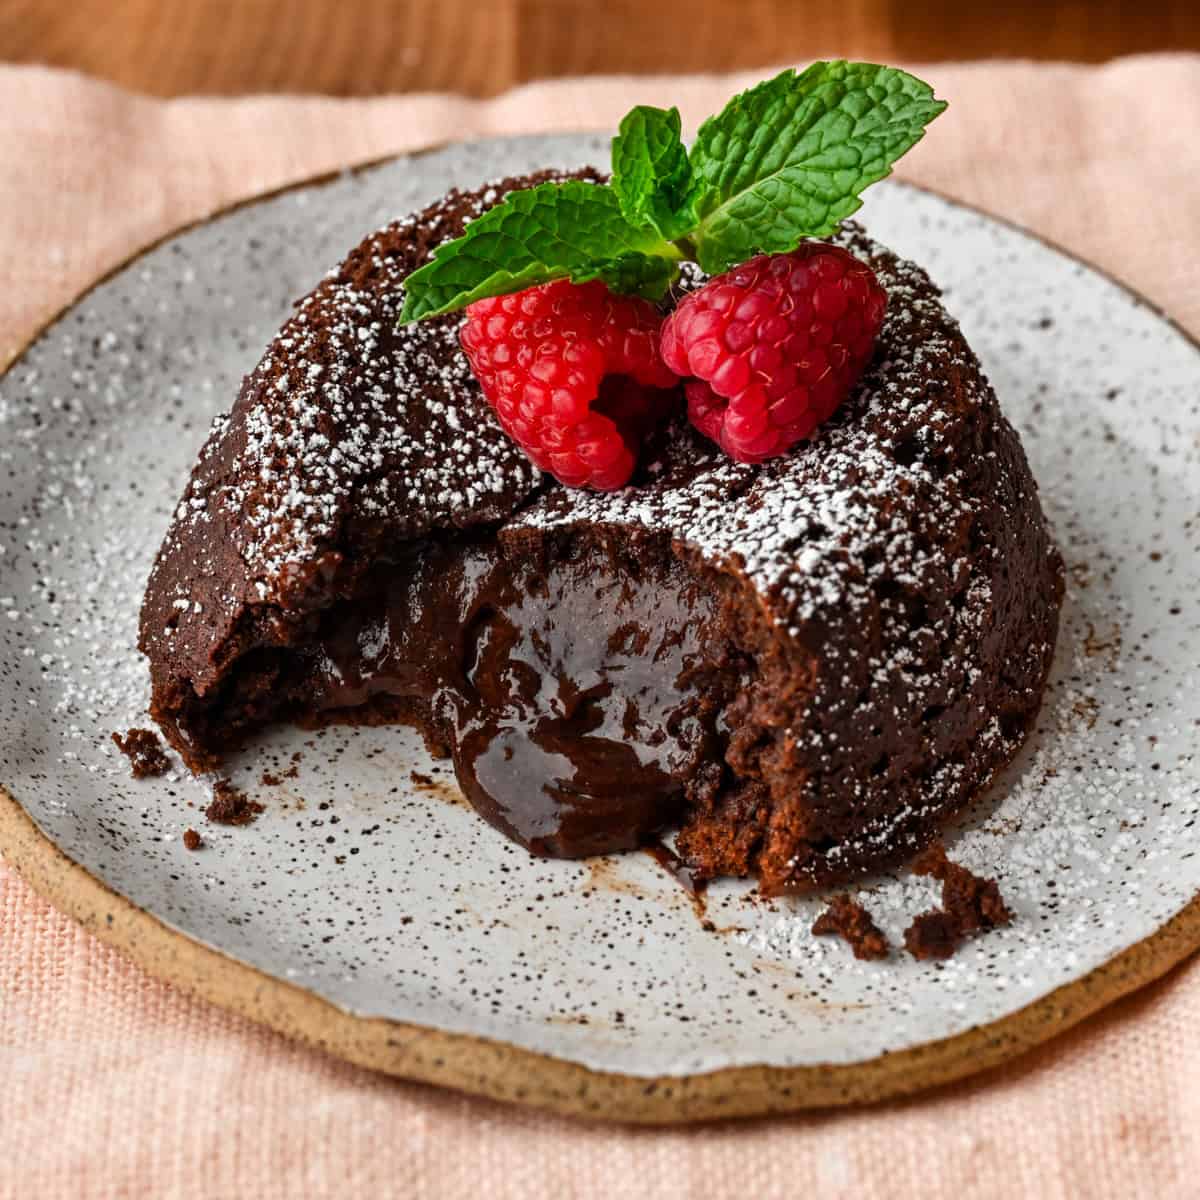
To plate, carefully place your serving plate over the top of a hot ramekin. Using a hot pad to protect your hands, firmly grasp both the plate and the ramekin, then quickly and confidently tip them over so the plate is resting on your counter. Give the plate and ramekin a light tap or two – you should feel the cake slide out. With a hot pad, gently lift the hot ramekin off the cake, revealing your perfectly formed, perfectly molten masterpiece.
The beauty of these cakes is their versatility in serving. While they are magnificent on their own, consider enhancing the experience with a dusting of powdered sugar, a scoop of vanilla bean ice cream, a dollop of fresh whipped cream, or a scattering of fresh berries. The contrast of cool toppings against the warm, flowing chocolate is truly divine. Of course, there's always the option to simply dig in right from the ramekin – a less formal, but equally satisfying way to enjoy your creation. For those who love the convenience of preparing ahead, our guide on
Easy Make-Ahead Molten Lava Cakes: Your Homemade Guide offers invaluable tips.
Conclusion: Your Journey to Molten Chocolate Bliss
Creating perfect
molten chocolate lava cakes is a truly rewarding culinary adventure. From meticulously beating eggs to selecting the finest chocolate, carefully baking, and executing that elegant flip, each step contributes to the ultimate goal: a breathtaking dessert with a glorious, flowing chocolate center. The process is far simpler than its restaurant-quality results suggest, making it an ideal treat for special occasions or just a spontaneous indulgence. With these secrets in hand, you’re ready to impress your guests, delight your family, and most importantly, treat yourself to one of the most sublime chocolate experiences imaginable. Get ready to witness the magic unfold as you cut into your very own homemade molten lava cake!